Deprecated: str_replace(): Passing null to parameter #3 ($subject) of type array|string is deprecated in /home/dh_v42ktt/kitchendelightspro.com/wp-content/plugins/all-in-one-seo-pack/app/Common/Traits/Helpers/Strings.php on line 129
- Pro-Level Recipes for Everyday Home Cooks

How to Create the Ultimate Charcuterie Board

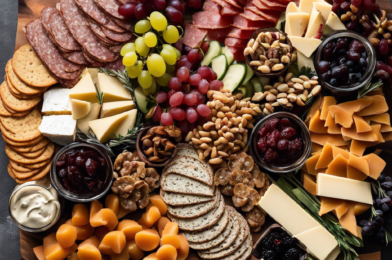
Creating the perfect charcuterie board is an art—a delicious and visually stunning centerpiece that elevates any gathering, from casual get-togethers to elegant dinner parties. It’s a delightful feast for the eyes and the taste buds, offering a delightful array of flavors, textures, and colors. Here’s your step-by-step guide to crafting a charcuterie masterpiece.

Begin by selecting a board that suits your style and the size of your gathering. Wooden serving boards are a classic choice, adding a rustic charm to your spread. Consider the shape and size; a rectangular board provides a good foundation, while a round board can create a more dynamic presentation. Ensure it’s large enough to accommodate your chosen meats, cheeses, and accompaniments comfortably.


Choosing the Meats:
The star of your board is the charcuterie, a term encompassing an array of cured meats. Opt for a variety of flavors and textures, such as savory prosciutto di Parma, spicy chorizo, rich pâté, and smoky speck. Aim for three to five types of charcuterie, allowing for a well-rounded selection.

Selecting Cheeses:
Cheese is the perfect complement to charcuterie, offering a balance of flavors. Choose three to five cheeses, considering a mix of soft, hard, and blue cheeses. Brie, Camembert, and fresh mozzarella are soft cheeses with a creamy texture. For hard cheeses, go for classics like sharp cheddar, Gruyère, or Parmigiano-Reggiano. Blue cheeses like Stilton or Gorgonzola add a robust, tangy flavor.

Adding Accompaniments:
Elevate your board with a variety of accompaniments that enhance the meats and cheeses. Fresh and dried fruits like grapes, figs, apricots, and apples provide a refreshing contrast. Nuts such as almonds, pistachios, and walnuts add crunch. Consider adding olives, honey, mustard, or chutney for extra flavor dimensions. Don’t forget the bread and crackers, offering a base for delicious pairings.

Arranging Your Board:
Now, it’s time to compose your masterpiece. Start by placing the cheeses and meats across the board, leaving spaces for accompaniments. Fold or roll meats and arrange them in small piles or fans. Cut some cheeses into cubes or slices, and display others in wedges. Add the accompaniments, clustering similar items together but ensuring a balanced spread.

A beautifully crafted charcuterie board is a delightful and interactive experience for your guests. It encourages exploration and conversation, making it the ultimate centerpiece for any gathering. Whether it’s a casual wine night or an elegant dinner party, the charcuterie board is a culinary adventure that delights the senses.

10 Secrets to Making Restaurant-Quality Pasta

Fresh, homemade pasta is a true delight and a dish that many aspiring home cooks aspire to master. Achieving that perfect al dente bite, creating rich and flavorful sauces, and mastering the art of presentation can elevate your pasta dishes to restaurant-quality levels. Whether you’re a novice cook or a seasoned chef, these 10 secrets will guide you toward creating exceptional pasta experiences right in your own kitchen.

1. Choose Quality Ingredients: The foundation of any great pasta dish starts with quality ingredients. Opt for high-quality, imported Italian pasta flour like Semolina or 00 flour for a refined texture. Fresh, free-range eggs and extra virgin olive oil will also make a difference in both flavor and color. When it comes to sauces, use ripe tomatoes, fresh herbs, and high-quality cheeses for the best results.

2. Master the Dough: Making pasta dough is an art. Use a ratio of 100g of flour to one large egg per person. Create a well in the flour and gradually incorporate the eggs. Knead the dough until smooth and elastic, and don’t be afraid to adjust the moisture content by adding small amounts of water or flour as needed. Properly kneaded dough should be soft, supple, and slightly sticky.

3. Rest and Roll: Resting the dough is crucial for gluten development and ease of rolling. Cover the dough and let it rest at room temperature for 30 minutes. This simple step will make a big difference in the texture and handling of the pasta. When rolling, start with the thickest setting and gradually work your way down to your desired thickness.

4. Cut to Perfection: For long pasta shapes, like fettuccine or tagliatelle, use a sharp knife or pasta cutter to create uniform strands. For filled pasta, practice makes perfect. Use a ravioli stamp or a small cookie cutter to ensure consistent shapes and sizes.

5. Salt Your Water: Salting your pasta water is essential for flavor. Use a generous amount of salt, as the pasta will absorb the seasoned water, enhancing its taste. Aim for about 1 tablespoon of salt per liter of water.

6. Cook Al Dente: The secret to perfect pasta lies in its cooking time. Always taste-test your pasta a minute or two before the package instructions suggest. Pasta should be al dente, meaning it has a slight bite and is not mushy. Reserve some pasta water before draining, as it can be used to adjust the consistency of your sauce.

7. Sauce with Precision: Pasta and sauce should marry beautifully on the plate. Heat your sauce in a pan and add a splash of reserved pasta water to create a creamy, smooth consistency. Toss the sauce with the pasta over medium heat to create a cohesive dish.

8. Finish with Flair: Finish your dish with high-quality extra virgin olive oil, freshly grated Parmesan cheese, and freshly chopped herbs. These final touches add flavor, aroma, and a professional touch to your pasta.

9. Experiment with Flavors: Don’t be afraid to experiment with different sauces and flavor combinations. From classic tomato-based sauces to creamy pesto and rich carbonara, each sauce brings its unique character to your pasta.

10. Presentation is Key: Take a moment to arrange your pasta on the plate thoughtfully. A simple twirl or gentle fold can make your dish look elegant and inviting. Garnish with fresh herbs and perhaps a sprinkle of pepper for a stylish touch.

Making restaurant-quality pasta is a rewarding culinary journey. With practice, you’ll soon be creating delicious, authentic pasta dishes that will impress your family and friends. Remember, the key to success is in the details, from selecting the finest ingredients to mastering the cooking process and presenting your creations with care. Buona cucina (happy cooking)!

How to Master the Perfect Risotto

Risotto, the creamy and comforting Italian rice dish, is a culinary masterpiece that can be surprisingly easy to master once you understand the fundamentals. Achieving the perfect risotto is an art, requiring patience, attention to detail, and a few simple techniques. This guide will take you through the steps to create risotto that’s worthy of a Michelin-starred restaurant in your own kitchen.

The foundation of a great risotto lies in the rice. Arborio, Carnaroli, or Vialone Nano rice are the most commonly used varieties due to their high starch content, which gives risotto its characteristic creaminess. When you cook these rice grains slowly, while gradually adding hot stock, they release starch, creating a luscious, velvety texture.

To begin, heat a good quality, flavorful stock (chicken or vegetable) in a separate saucepan. Keep the stock warm over low heat, as you will be gradually adding it to the rice. In a large, heavy-bottomed pan, sauté shallots or onions in butter or olive oil until translucent. This step is crucial for flavor development.

Next, add the rice to the pan and ‘toast’ it, stirring continuously until the grains become slightly translucent around the edges. This toasting process seals in the rice’s flavor and ensures each grain remains distinct.

Now, it’s time for the ‘magic’ to happen. Begin adding the hot stock, one ladle at a time, stirring continuously. This step is the key to a perfect risotto. As you add the stock, the rice will slowly absorb the liquid and release its starch, creating a creamy sauce. Keep the risotto at a gentle simmer as you continue this process.

Patience is vital. It typically takes about 18-20 minutes for the rice to cook through, and you should be stirring and adding stock almost constantly during this time. As you near the end, taste the rice to check for doneness. It should be creamy and tender, yet still retain a slight bite—al dente, as the Italians say.

When the rice is cooked to perfection, stir in your choice of finishing ingredients, such as grated Parmesan cheese, butter, heavy cream, or even a touch of wine. These final additions enhance the creaminess and flavor of the risotto.

The beauty of risotto lies in its versatility. You can add almost anything to it, from mushrooms and seafood to meats and vegetables, making it a perfect canvas for your culinary creativity. With this guide, you’re now equipped to create a risotto that will impress your guests and satisfy your culinary cravings.

Remember, the key to a perfect risotto is patience, attention to detail, and a generous hand with the stirring!